How To Draw A Table On Word
How To Draw A Table On Word - Open word or the document where you wish to put a table. How to create a word table from existing text. You can modify it any time. Select insert > table > insert table. 59k views 6 years ago #linkedin #word #howto. A dialog box will pop up. Two basic methods of designing. The cursor turns into a pencil, which you drag down and across to draw a box. For a larger table or to customize a table, select insert > table > choose row and column. Go to the ‘insert’ tab. In word 2003, click the “insert” menu and then select “table”. To quickly insert a table: Position the cursor on the area where you want the table to be inserted. Once you have it open, you’re ready to start building your table. For a basic table, click insert > table and move the cursor over the grid until you highlight. Select insert > table > insert table. Drag it down and across the document to draw a box. Insert separator characters—such as commas or tabs—to indicate where to divide the text into table columns. In word, you can insert a table, convert text to a table, and even draw a table. A dialog box will pop up. Word is a versatile tool for all your document needs. To quickly insert a table: For larger tables, or to customize the table: Web click insert> tables > draw table. Click the “table” button that is located under the “insert” tab. Web to draw your own table, select insert > table > draw table. Web launch the microsoft word desktop app on your pc and open the document in which you want to insert a table. Scroll down and click draw table. Web how to make a table in microsoft word. Open up your ms word document. Insert separator characters—such as commas or tabs—to indicate where to divide the text into table columns. Don’t worry about the exact dimensions; To quickly insert a table: Web click insert> tables > draw table. Click the insert tab in the ribbon area and select table from the menu options. Click the “table” button that is located under the “insert” tab. Web to draw your own table, select insert > table > draw table. Using tables, and even changing them on the fly according to the data, has become far easier in the newer versions of word such as microsoft word 2019 and office 365. For a basic table, click insert > table and move the cursor over the grid until you highlight the number of columns and rows you want. Drag it down and across the document to draw a box. This will activate the pen tool with which you'll draw your table.:max_bytes(150000):strip_icc()/Capture-717773757bd0403baa4bcebb1aad4c30.JPG)
Working With Tables in Microsoft Word for Beginners

How to create tables in Microsoft Word
How to Create and Format Tables in Word HubPages
Select The Table By Clicking The Table Handle On The Top Left Of It.
Drag To Draw The Outline Of The Table First.
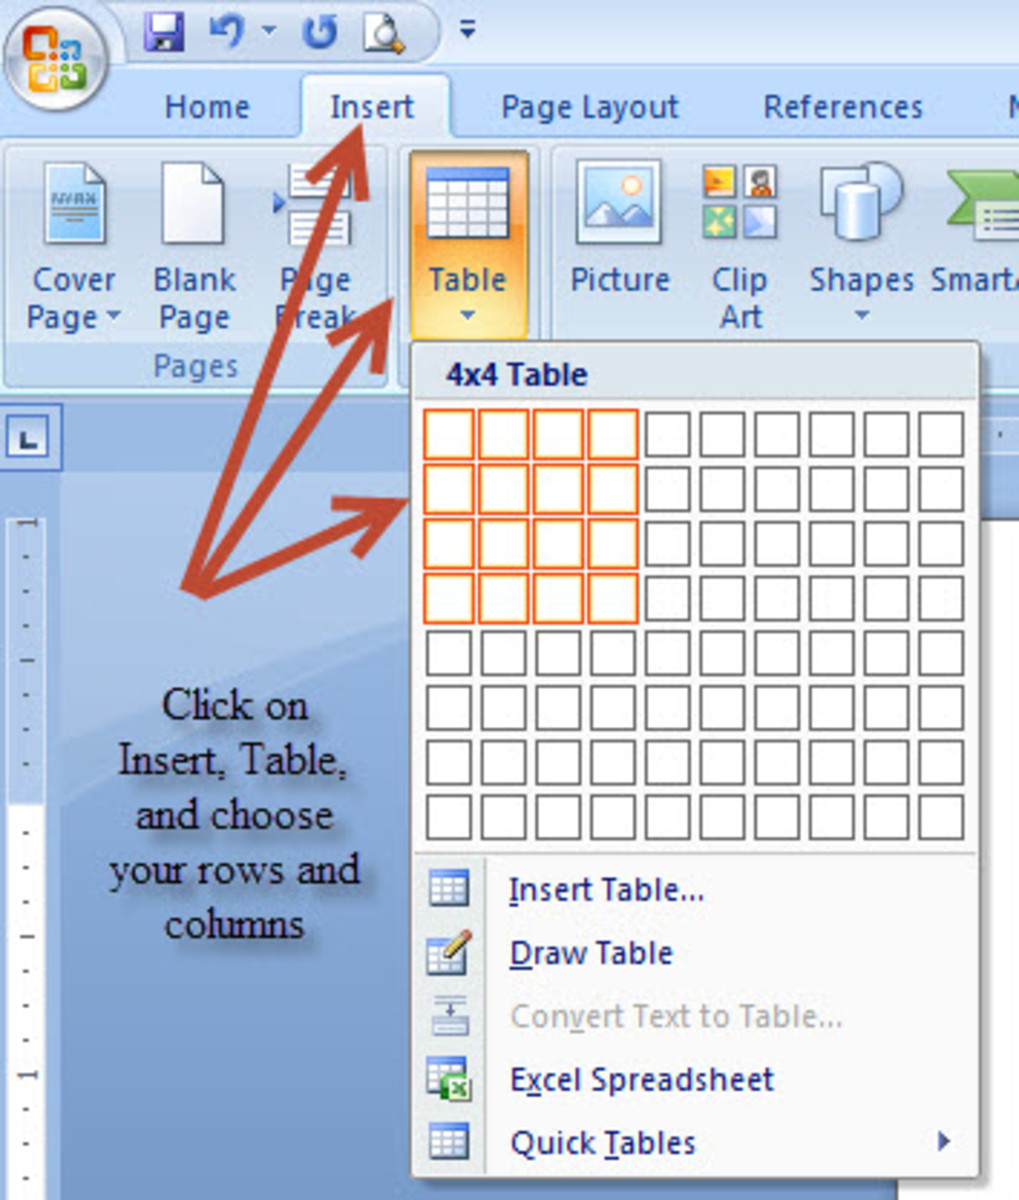
Go To The ‘Insert’ Tab.
For Larger Tables, Or To Customize The Table:
Related Post: