How To Draw A Four Leaf Clover Step By Step
How To Draw A Four Leaf Clover Step By Step - Let’s draw one of the leaves. Four leaf clover drawing steps. Next, draw a curved line at the top of the stem to create the first leaf of the clover. Draw a circle that will serve as your clover base and draw a line to show the direction of the stalk. Set the object limits on the sheet of paper. Draw the first pair of leaves. At the top of the stem, draw a curved line that bends slightly to the right. Web do you believe in luck? Subscribe for regular drawing and art lessons: Web how to draw a four leaf clover. How to draw a four leaf clover step 3. How to draw a four leaf clover step 2. Using straight lines, intersecting at the straight angle, show the clove leaf veins growth direction. Draw a small heart shape that tilts slightly to the left. Obviously, as the name suggests, there are four. Start by drawing a circle on a piece of paper. Web in this video, we will show you how to draw four leaf clover step by step easy with easy drawing tutorial s. Draw two intersecting lines to divide the circle into four equal parts. Create the four clover leaves. With this easy four leaf clover drawing ideas, you can. Notice how they taper on the end and have a slight curve. Make sure the end of the leaf is pointed. 7.1k views 1 year ago. At the top of the stem, draw a curved line that bends slightly to the right. How to draw four leaf clover i easy ==================== in this video i will teach you how to. How to draw a four leaf clover step 2. Obviously, as the name suggests, there are four. Start by drawing a vertical line that will serve as the stem of your clover. Four leaf clover drawing steps. Sharpen your pencils and switch to sketching mode. You can use a compass or round object to draw a perfectly round circle. Start drawing all the hearts from the center point of the circle. Draw a circle that will serve as your clover base and draw a line to show the direction of the stalk. We begin constructing the leaves of your clover drawing. Now you’ll sketch in center vein marks on each petal starting from the center. 7.1k views 1 year ago. Notice how they taper on the end and have a slight curve. At the top of the stem, draw a curved line that bends slightly to the right. Next, draw a curved line at the top of the stem to create the first leaf of the clover. Patrick's day crafts and diy projects! Web so, why wait?
How to Draw a Four Leaf Clover HelloArtsy

How to Draw a FourLeaf Clover Easy Drawing Tutorial For Kids
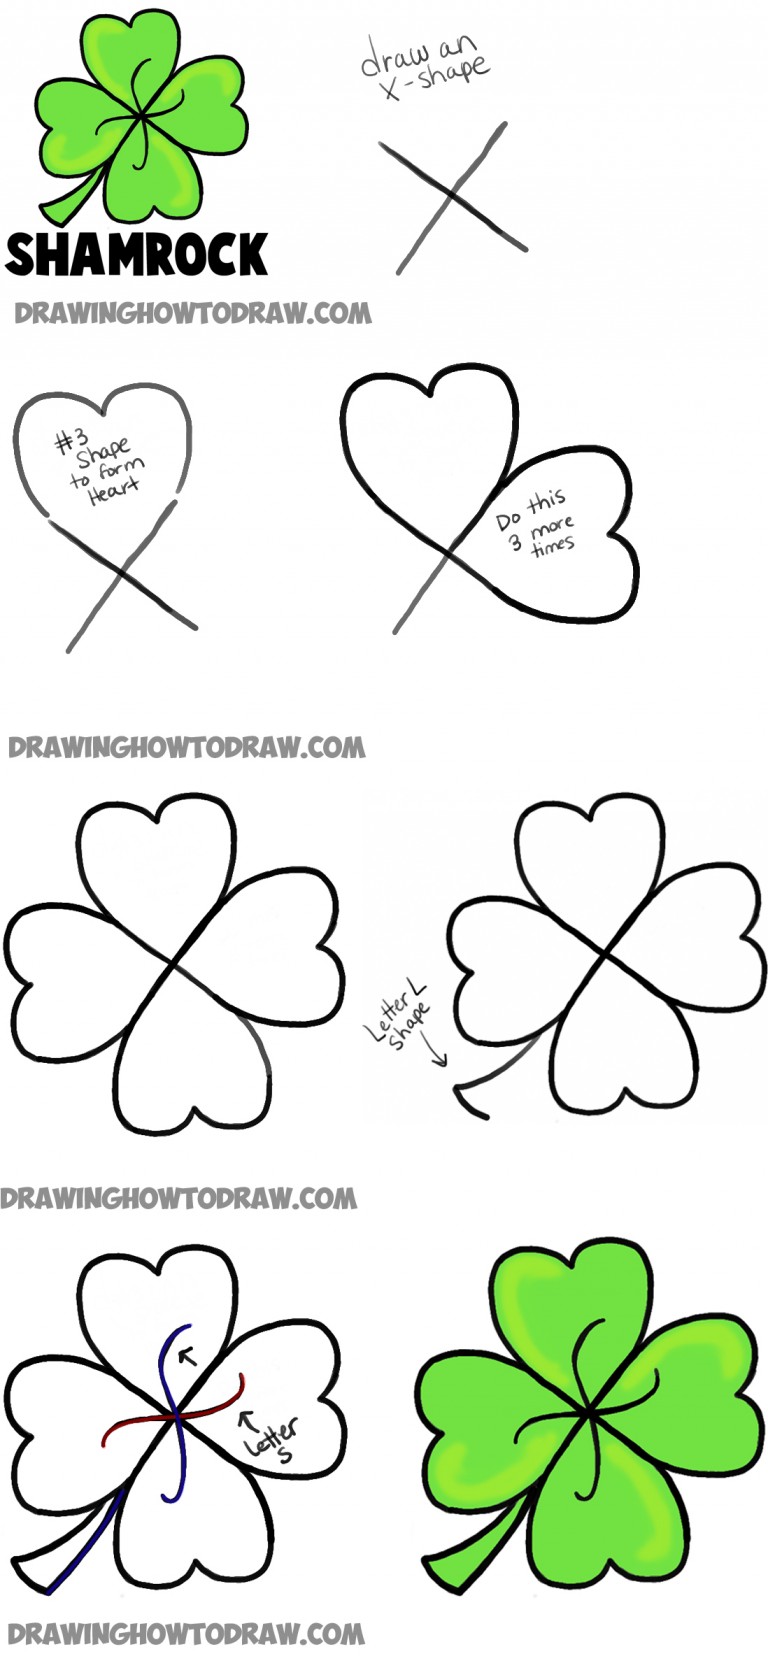
How to Draw a Four Leaf Clover or Shamrocks for Saint Patricks Day
Next Draw In The Other 3 Leaflet Shapes, Joining The Points In The Middle.
Let’s Draw One Of The Leaves.
Each Heart’s Point Meets In The Middle.
Create The Four Clover Leaves.
Related Post: